11/21/2012 0 Comments Decorative Mugs
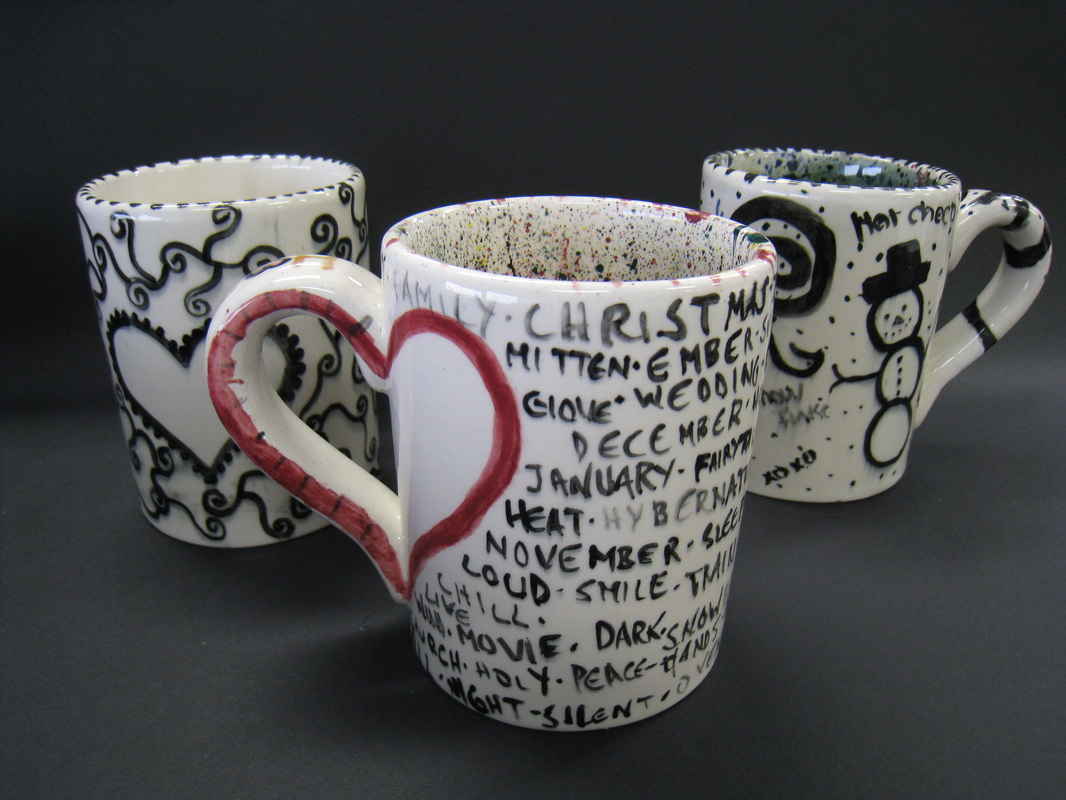
Check out these decorated mugs fresh out of the kiln this morning! I am so excited about how they came out. These are pre-made mugs that I bought from Blick Art Supply that are decorated with a combination of under-glaze markers, black glaze with a small paint brush, colored glazes and a clear coat over the finished product. Due to the high cost, I was able to do this project with the 30 kids in my after school art club. Since they pay a supply when they join I am able to do extra fun projects like this with them! A lot of students are excited to give these as holiday gifts. I know I'd be excited to open a hand made gift like this anytime!
0 Comments
10/11/2012 0 Comments Playing GamesTonight we will be talking about incorporating the element of play into the classroom on Twitter's #ArtsEdChat. I like to use games for a quick five minute break when we are in the middle of a big project to help boost energy levels, or if we clean-up a little early and have a few minutes left at the end of class. Once in a while I'll even take half of a class period to do a longer game if I think it will help improve the class dynamics.
A few art games... Pass and draw: Have all students start drawing an illustration of anything they want. After a certain amount of time, tell them to stop drawing and to pass their paper to the person to the right of them. This person is then responsible for adding more to the drawing. Repeat this process until the paper goes around the whole table, or even the whole classroom, depending on how long you limit kids to drawing. I think this is a great one to get kids drawing things they might normally not. Exquisite Corpse: A classic! Fold a piece of paper three times. Student one draws the head and continues the lines a little bit into the next section. Student two draws the middle of the body without looking at what the first person drew. Student thee draws the bottom. Once the last person is done, hand the paper back to the original owner, open the paper and have a good laugh at what was created! I’ve also done this with collage and clay in small groups. Kids have a ton of fun with this one. Pictionary: If there are only a few minutes of class left I'll have a student draw on the SMARTboard. The student that guesses the word is the next one to go up to draw. If there's a lot of time I'll divide the class into two teams and play against each other. Movement/Acting Games... Anything Fabric: Students sit in a circle. I take out a table cloth and ask them to turn it into anything else, by folding, rolling, laying it out, etc and acting with it without talking. Each student uses their imagination to turn it into something such as a Superman cape, sub sandwich, newspaper, and the list goes on and on. Students can call out what they think the person with the table cloth has turned it into. Once the class has guessed what it is, the table cloth is passed to the next person in the circle. Sometimes students are shy about participating, but I like to have everyone act out so certain students might need help with an idea or some encouragment. Random Games... While all of the games above tie into art and creativity, I also like to just do a game for fun once in a while. Some that my classes like to play are 7-Up, 4 Corners and Silent Ball! 10/2/2012 6 Comments Gesture DrawingsThroughout the first month of school, the 6th grade classes have been learning about the Element of Art LINE. Our big project using line, was creating animal zentangles in which we used many different types of lines to incorporate pattern into the drawing. You can check them out on Artsonia here.
We've also discussed the difference between types of lines that you can draw with such as outline, contour, sketch and gesture lines. Last Friday we spent the class period doing figure drawings. Various students volunteered to pose throughout the period as the rest of the class drew. Poses lasted from 30 seconds to 2 minutes. We started to warm up by doing gesture scribble drawings and then proceeded to regular gestures. The kids always have a lot of fun doing this activity AND they get better at drawing people! 9/30/2012 1 Comment What are your five words?![]() Imagine you were going to introduce yourself to someone that you had never met before, but could only give them five words that best describe you. What five words would communicate the essence of who you are? This is the challenge that I gave to my students last week.
The idea came about when we started working on our first set of Artist Trading Cards for the ATC school exchange. The theme for this month is, "All about ME: Introductions and Goals for the Year." When I first told students about the exchange I wanted them to have a lot of independence. I told them they could do anything they wanted on the card and use any medium that was interesting, as long as the card was about themselves. However, as they began working we realized that the cards were very pretty, but they could do a better job of introducing themselves visually on the ATCs. That's when I asked them to re-think how they were approaching these and start again by brainstorming a list of words about themselves. After they each had a big list of words, I asked them to narrow it down to their top five. It was fun to hear what student's chose as their words. Not only did I learn a lot about each student through this activity, but they also go to know each other as peers as we shared our words in class. Hopefully the students that receive our cards will enjoy them too! By the way, my five words are "art, teacher, family, love, learner," and my sample card for the project is the photo above. Not only did students have to think of their five words, but they also needed to figure out how they could make a symbol that illustrated each word and how to put them all together in an interesting way. I think my students learned a lot from of these 2 1/2" X 3 1/2" miniature works of art! So, what are your five words? I'd love for you to share them! 9/14/2012 2 Comments Why I Love ArtsoniaI started using Artsonia three years ago and have never looked back. In one word, the site is "AMAZING."
So, why I think Artsonia is amazing? 1. Students get to have their artwork published to a global audience. They feel proud of themselves and their work when this happens. A huge part of my philosophy as an art educator is to help increase student's self-esteem. Artsonia lets me show off their artwork to the entire world! It doesn't get much bigger than that. 2. Their work is saved FOREVER on this site. They will be able to look back at it years from now and remember what they created in middle school. I wish we had this technology back when I was their age. All I have is a folder that is falling apart with a handful of pieces in it. 3. Once a parent registers with the site, they receive an e-mail every time their child has a new piece of art that has been published. As a teacher, I don't have to remind parents about checking in with the site. 4. Parents can stay engaged with what their child is making in art class as it happens. I usually don't send home actual artwork until the end of the semester. Some children never bring it home as it gets left in their locker or even "lost" on the way home. Through Artsonia, parents can view all of their child's work for the year as it is being created 5. Additional e-mails can be added as part of a students "fan club." This allows grandparents, aunts, uncles and other far away family members/friends to see the amazing artwork students create. The more family and friends see a child's artwork, the more encouraging comments they receive. When this happens, my student's self-confidence increases and they become even more interested in art! It’s a win for everyone. 6. Parents can purchase products with their child’s artwork on them with 20% going directly back to the art room. No other website that I know of like this will automatically generate funds for your program directly. You can get a check made out to your school, a gift certificate to Blick Art or Artsonia and new this year is a fund for iPads! 7. It makes your program very visible to not only parents but also administrators and community members. I know that most of us in the field of education have very little free time. It’s hard to think of adding another task to our to do list. However, I can't say enough about Artsonia! Once you get into the routine of taking photos of students work and uploading them it goes quick. You can check out the Coolidge Artsonia gallery here. So, why do you love Artsonia? 8/31/2012 2 Comments Welcome Back & Art Room Makeover![]() It's always hard to believe how quickly the summer goes by! Hopefully everyone has had time to relax, reflect and recharge their batteries. With every ending, comes new beginnings. As we start up this new school year, it's exciting to think ahead to all the amazing possibilities the year has to offer. New connections to students, new project ideas and the use of even more technology are all things I am looking forward to in the months ahead. I spent a lot of time on Pinterest this summer getting ideas for the art room. I can't say enough how much I am in love with this site! It is my number one resource for everything school related. I thought I'd share some of the art room makeover that took place of the last few weeks. Tables are now named different colors. I hot glued fabric inside buckets and then hung them from the ceiling with fishing line so that it gives the illusion that paint is spilling out of them. I can assign each table a clean-up job and simply call them by color name now to get things rolling. (I can't find my source for this! I saw it on someone's blog or Pinterest. If it was you please let me know so I can give you credit.) I thought these tissue paper poms were really fun! This idea came from the Clutter-Free Classroom Blog. She has wonderful ideas. I'm hoping to have students help me make more of these throughout the year when they are finished early with a project. I'd like to have them going all around the top of this wall. I also saw the time flies idea around the clock on Pinterest. Another idea that I give Pinterest credit to. The kids reaction on the first day was "Whoa! That's cool!" It was fun to paint chalkboard paint on my storage room doors! I will probably leave this up for a few weeks. My grand plan is to let students draw on it. I also ran across this physical Facebook wall which was a second part of this idea inspiration. ![]() This was a great classroom management idea that I found on Pinterest. If students get too loud, I will simply turn over the letter "A" letting them know it's too loud. If I have to turn the "R" over it is the last warning. If the "T" is turned over then students loose the privilege of talking the remainder of class. I like this idea because there is a visual reminder to students and a specific consequence if it has to be said three times. I've had these posters up for a few years now. I like the constant reminder that the skills they are learning in art class prepare them for hundreds of different jobs.
Hope you enjoyed the tour of the Coolidge Art room. Good luck to everyone starting up a new school year! I hope it is filled with amazing adventures and possibilities. 6/5/2012 2 Comments Scavenger Hunt Photo ProjectPhotography in the middle school setting can be tough in terms of logistics. What can students take photos of around the school when all of the other students are in classes that can't be disturbed and we live in New England where the weather is not always conducive for going outside? One answer that has produced pretty interesting results is a photography scavenger hunt! The scavenger hunt list could revolve around any type of theme or be a random list of ideas. As a teacher I like that it promotes creativity as I don't see photos of the same things over and over again. Students also seem to like the challenge of checking each item off the lists.
My students recently did a scavenger hunt with photos that showed off their interests and personality. Here is the list we used: 1. Your name in a creative way. 2. Capture your reflection in an unusual way. 3. Spell a word that is meaningful to you with objects or people on the ground. 4. Something with your favorite color. 5. Something you are wearing or have on you. 6. An object that is interesting up close. 7. Something fun or funny to you. 8. Something you couldn’t live without. 9. You favorite thing about school/being at Coolidge. 10. Something that shows off one of your interests. Students then used Animoto to produce a video showcasing their photos. We had a video day where we watched them all on the SMARTboard and had some food to go along with it! Overall it was a very fun project! If anyone has any other scavenger hunt themes or ideas I'd love to hear about them 6/1/2012 0 Comments Alphabet PhotosI'm very behind on posting to my blog, but wanted to share some photos that my 7th grade students took a few weeks back. For the first photography assignment I had students try to find hidden letters of the alphabet around the school. This was a project that I did in my Intro to Photography course at Syracuse University many years back. Since the assignment is still memorable to me all these years later, I thought my students might also enjoy it. You can also buy custom gifts using photo letters at sites like this. To begin the project, I have them watch the commercial below. We discuss how the images are interesting because they make you look at everyday objects in a different way. This ties well into introducting students to be creative with both their subject matter and how they take their photography shots. Students worked in groups of 2-3 with one camera. Their goal was to walk around the school looking for hidden letters in their everyday environment. While it was mostly an exercise in being creative with their photography, I did also encourage them think about their composition and perspective of each shot. Here are some of their letters! Last week I introduced digital photography to my 7th grade enrichment class. Our school has a case of 12 cameras that teachers can sign out to use with students. I have kids work in pairs or groups of three in some cases so that the entire class can work on a project at the same time.
In previous years I had given my students a quick overview of how to use the cameras and sent them on their way. However, after attending a fabulous session at the NAEA Convention last month called "From Pix to Art: 10 Step Digital Photography for the Middle!" led by Teresa Nagel, I changed my tune. She emphasized how important it is to spend a whole class period making sure students really understand all of the features of the camera in order to take quality shots. The list below reflects many of the examples that she gave to have students go through that first day with the camera, as well as a handful that I have added to get them thinking about the artistry of their shots. _______ Turn the camera on. _______ Turn the camera off. _______ Use the zoom. _______ Take a photo with the flash on (lightning bolt symbol). _______ Take the same photo with the flash off to see how different it looks. _______ Take a shot of something up close in macro mode (flower symbol). _______ Take a photo at ground level. _______ Take a photo from a birds eye view level. _______ Take a photo of something that fills the frame and has virtually no background. _______ Take a photo of something from far away. _______ View the photos that you have taken so far. _______ Delete one of the photos you took off the camera. _______ Take a 5 second video clip. _______ Use a USB cord to connect the camera to the computer. _______ Download your photos to your folder on the network. _______ Delete all of the photos from the camera before turning it back in. 5/7/2012 0 Comments EdCamp Boston 2012It’s been a little over a week since edcamp Boston 2012 and I still can’t stop smiling about the experience! What an unbelievable day of learning, sharing and collaborating with other passionate educators. If you are an educator and have never been to an edcamp you should try to find one near you soon! It was amazing. As I arrived at the Microsoft NERD (New England Research and Development) Center I really had no idea what to expect. After a bit of free breakfast, coffee and meeting other teachers there was an explanation about the day from the organizers @dancallahan, @tsocko, @ldelia @lizbdavis, @karenjan). Anyone who knew they wanted to lead a session was asked to go downstairs and put a giant sticky note on the board. The board was filled with room locations and how many people could fit in each room. Within fifteen or twenty minutes most of the day’s sessions were put into a Google doc and the unconference was off and running! Sessions ranged from technology topics such as Twitter, BYOD, and iPads in the classroom to other educational issues like using theater games to teach empathy and Common Core. There was also free lunch and a lot of socializing with teachers from around New England, including meeting lots of people I have followed on Twitter for a while! I loved that the day was driven by the participants. Anyone could lead a session if they were interested in a topic or wanted to learn more about something. As I was looking at the board one person asked if anyone was interested in urban education. It got few positive relies and a session was born. The rule of two feet also ruled the day. If you got to a session and it wasn’t for you, you were encouraged to leave and try another session or even gather in the hallways for very informal conversations with other educators. Another highlight of the day was the smackdown that took place at the end of the day. Everyone in attendance was invited to have two minutes of time in front of everyone to show off something they thought was valuable such as a cool website, app or project. It was a great way to learn a lot of new things in a short amount of time. One of the websites I learned about at the smackdown was Thinglink.com. Check out my Thinglink of edcamp Bostonbelow! Can't wait for my next edcamp! ![]() |